In the world of Computer Numerical Control (CNC) machining, having the right tools and knowledge can make all the difference in achieving precision, efficiency, and reliability. For many CNC enthusiasts and professionals, the Mach4 CNC Controller is a pivotal component, offering advanced control features that enable users to push the boundaries of what’s possible with CNC machinery. However, mastering CNC isn’t just about the controller; it’s about understanding how each element works together to create a seamless operation.
To build a well-functioning CNC system, it’s crucial to understand the essentials: from the connections of your hardware with the PoKeys57CNC pinout to the critical safety features provided by Mach3 limit switches. Whether you’re a beginner or a seasoned professional, navigating this landscape requires a solid understanding of how these parts integrate. In this guide, we will walk you through everything you need to know—starting with the advanced capabilities of the Mach4 CNC Controller, and delving into the specifics of connecting hardware components, setting up safety measures, and following a step-by-step Mach3 tutorial to optimize your CNC experience.
By the end of this article, you’ll have a comprehensive understanding of how these tools work in tandem to create a streamlined CNC operation, empowering you to take full control of your projects and produce professional-grade results. Whether you’re setting up a new CNC machine or looking to upgrade your existing setup, this guide will serve as a key resource on your journey to CNC mastery.
Understanding the Mach4 CNC Controller
The Mach4 CNC Controller is a significant upgrade in the world of CNC control software, developed to replace its popular predecessor, Mach3. Known for its powerful features, scalability, and improved user interface, the Mach4 CNC Controller has become the go-to choice for many CNC hobbyists and professionals. In this chapter, we’ll explore what makes the Mach4 CNC Controller so special, why it’s the preferred choice for many, and how it can transform your CNC setup.
What is the Mach4 CNC Controller?
At its core, the Mach4 CNC Controller is a software platform designed to control CNC machines. Unlike traditional manual controls, Mach4 provides a digital interface, allowing for precise and automated control over a variety of CNC machines—from routers and mills to lathes and plasma cutters. It’s a highly customizable and powerful software that supports a broad range of CNC hardware configurations, making it a versatile solution for users looking to improve their machine’s accuracy and efficiency.
One of the standout features of Mach4 is its modular architecture. This means you can add, remove, or customize components as needed, tailoring the software to your specific CNC needs. Whether you’re working with a basic hobbyist setup or managing a complex industrial machine, the Mach4 CNC Controller provides flexibility without sacrificing performance.
Key Features of the Mach4 CNC Controller
The Mach4 CNC Controller is designed to provide superior control and a more user-friendly experience compared to older versions like Mach3. Some of the key features that set it apart include:
- Improved Motion Control: Mach4 boasts advanced motion control algorithms that lead to smoother and more precise cutting, even at higher speeds. This is crucial for complex designs that require a high level of detail.
- Enhanced User Interface: The interface of Mach4 is intuitive and customizable, allowing users to modify the layout and workflow to match their preferences. The software includes built-in tools for probing, diagnostics, and advanced visual feedback, which makes monitoring projects simpler and more efficient.
- Plugin Support and Extensibility: Mach4 supports a wide range of plugins that expand its capabilities. Whether you need additional motion control features, automation tools, or specialized communication protocols, the Mach4 ecosystem is designed to grow with your needs.
- Hardware Compatibility: While the Mach4 CNC Controller is often paired with popular hardware like the PoKeys57CNC, it supports a wide variety of motion controllers and hardware components. This ensures that you can integrate the software with existing setups or new machines without compatibility issues.
Why Choose Mach4 Over Mach3?
For many CNC users, upgrading from Mach3 to Mach4 is a significant decision. While Mach3 has been a staple in the CNC community for years, the Mach4 CNC Controller offers a more modern, reliable, and powerful solution. Mach3, while still popular, was not designed with the same scalability in mind, and some of its limitations can hinder complex CNC projects. Mach4 addresses these shortcomings with a more robust software architecture, improved motion control, and better support for contemporary CNC hardware.
Additionally, Mach4 is built with multi-core processing in mind, allowing it to handle complex calculations and operations more efficiently. This makes it ideal for high-precision tasks, where delays or inaccuracies can lead to costly errors. Whether you are aiming for increased accuracy, greater control, or just want to future-proof your setup, the Mach4 CNC Controller is a worthy upgrade.
Practical Applications of the Mach4 CNC Controller
With its advanced features and flexible architecture, the Mach4 CNC Controller is suitable for a wide array of applications. It’s often used in:
- Industrial Production: Where precision and repeatability are critical.
- Hobbyist Projects: Due to its versatility and ease of use for various DIY CNC builds.
- Educational Settings: As a teaching tool for those learning about CNC technology.
- Prototyping: For small-scale, detailed projects where quick changes are necessary.
By investing in the Mach4 CNC Controller, you gain a reliable, scalable, and customizable tool that can grow with your CNC projects. In the next chapters, we’ll delve into the hardware side of things—specifically, how to connect the Mach4 CNC Controller with your equipment using the PoKeys57CNC pinout, setting up critical safety mechanisms like Mach3 limit switches, and exploring step-by-step tutorials to optimize your CNC experience.
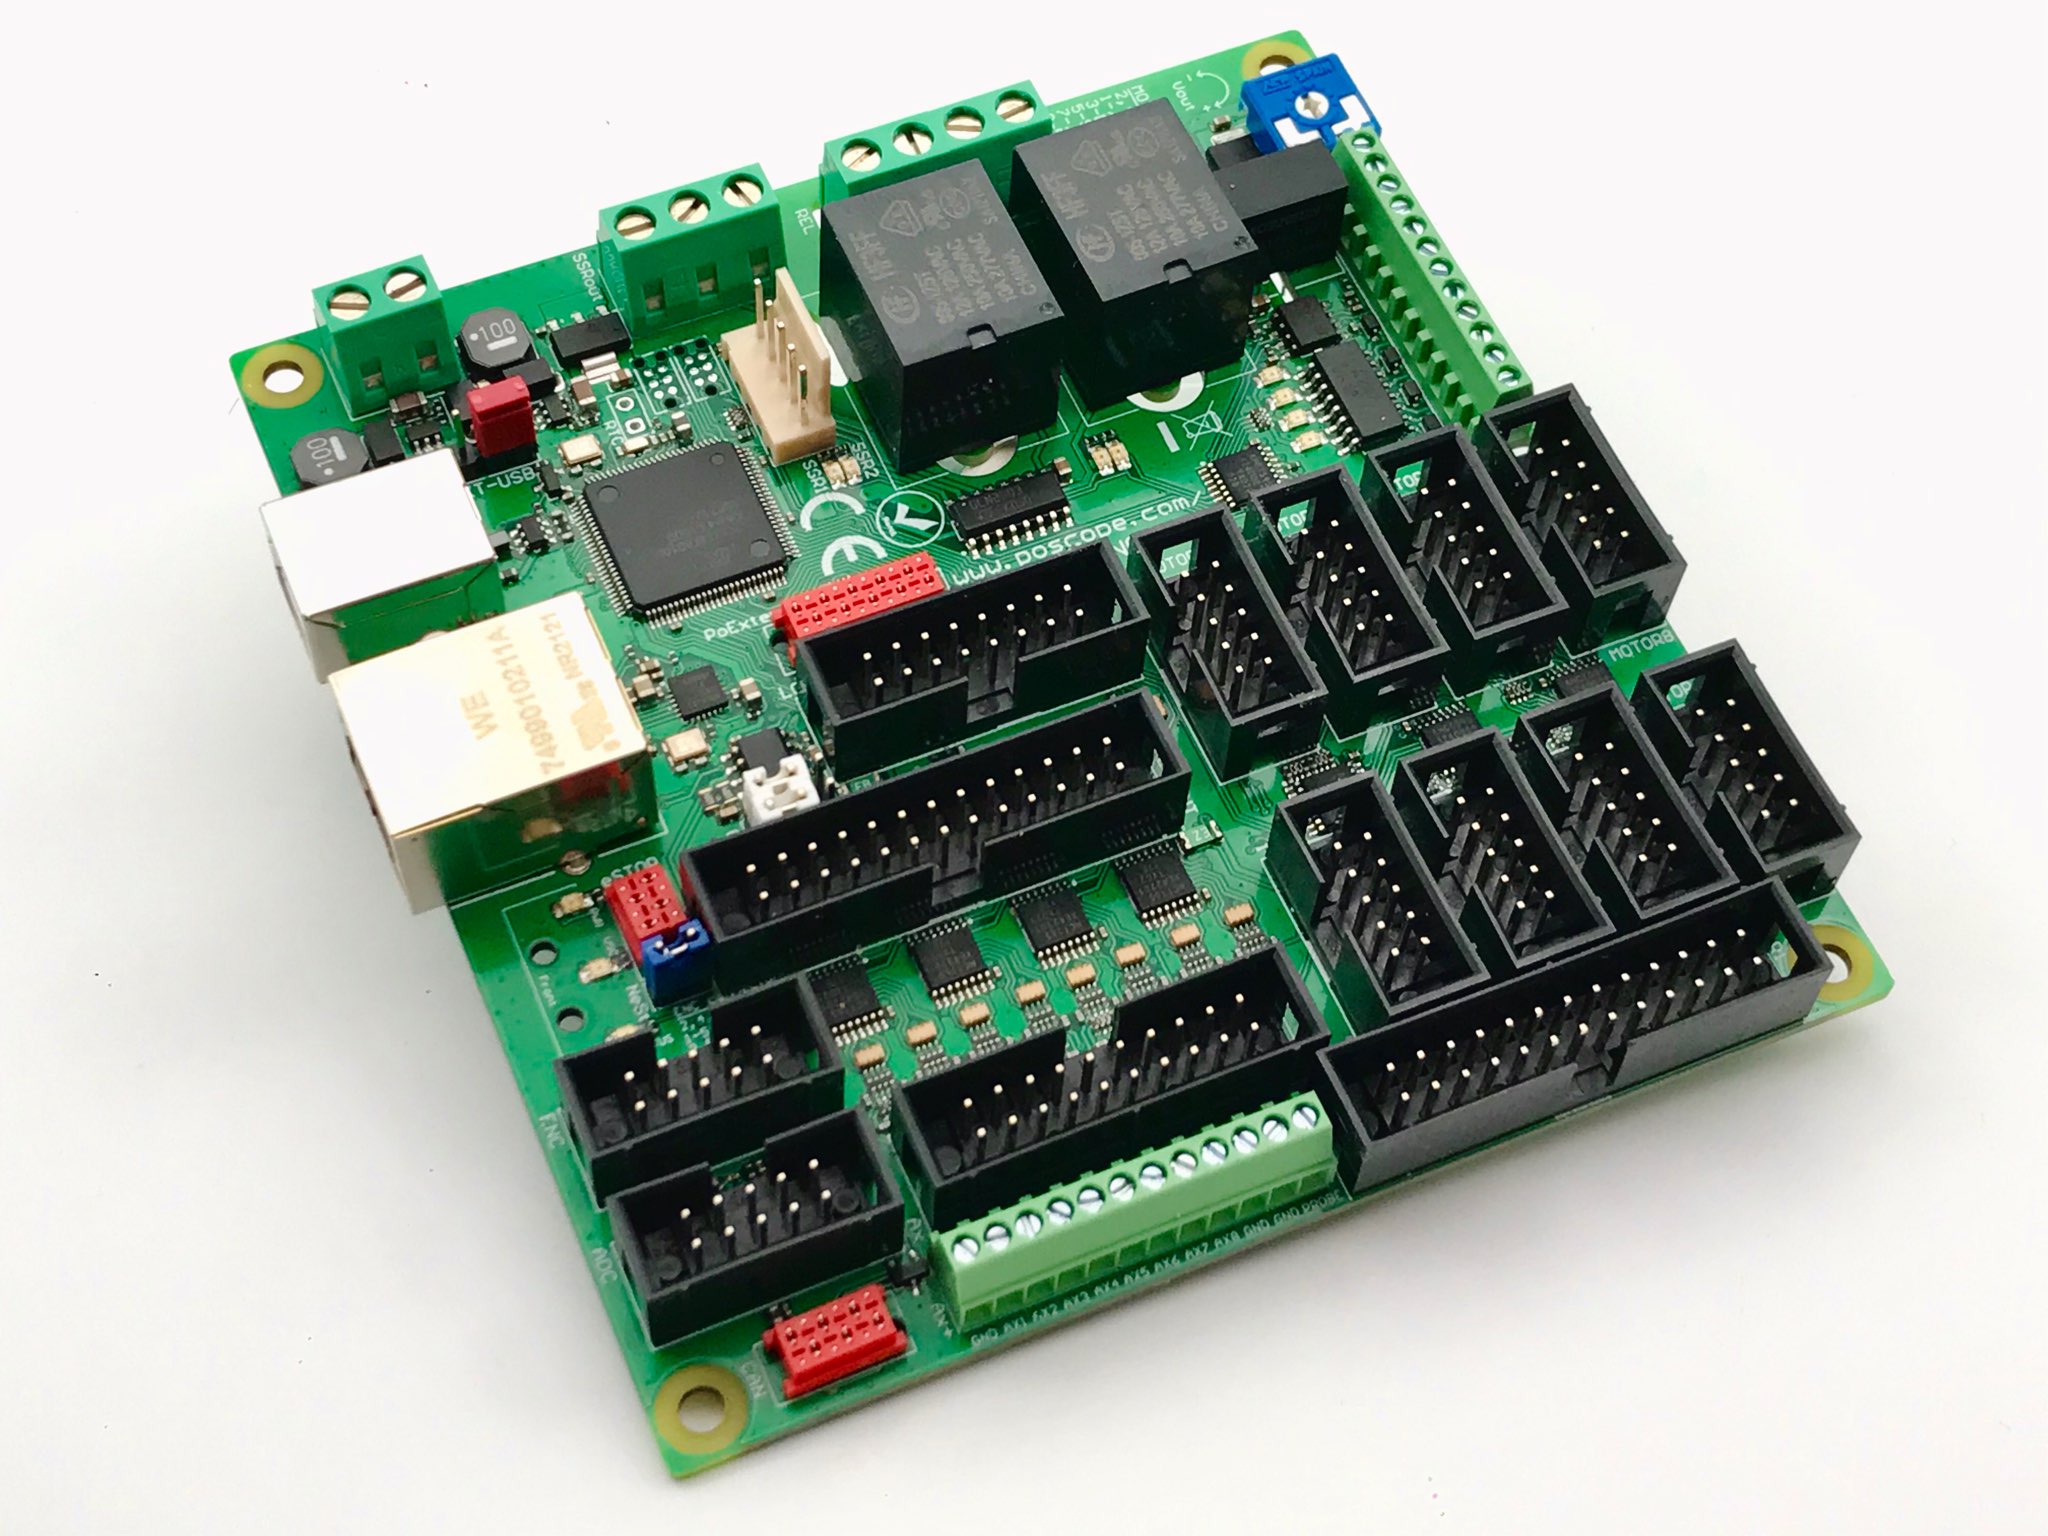
PoKeys57CNC Pinout: Connecting Your Hardware with Precision
A vital part of any CNC setup is the connection between the controller and the hardware, and that’s where the PoKeys57CNC pinout plays a crucial role. The PoKeys57CNC is a popular and reliable motion controller used to interface CNC machines with software like Mach4, offering a wide array of input/output (I/O) options that cater to complex setups. Understanding the PoKeys57CNC pinout is essential for anyone looking to establish a seamless, reliable, and efficient CNC system.
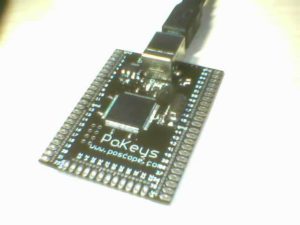
What is the PoKeys57CNC?
The PoKeys57CNC is a versatile motion controller designed specifically for CNC applications. Known for its adaptability and extensive connectivity options, it’s often chosen by CNC users for its capacity to handle intricate machines with ease. The PoKeys57CNC acts as a bridge between your computer’s control software—such as Mach4—and the physical components of your CNC machine, including motors, limit switches, and other peripherals.
One of the standout features of the PoKeys57CNC is its ability to interface with a variety of devices through a clear pinout. A pinout refers to a diagram or layout that maps out each connection point on the controller, specifying where each cable or wire should be connected. This clear mapping is essential for ensuring accurate communication between the software and hardware components.
How to Read the PoKeys57CNC Pinout
The PoKeys57CNC pinout is organized to provide easy access to multiple I/O connections, and it’s crucial to understand how to read it. A typical pinout will include several types of connections:
- Digital Inputs/Outputs (I/O): These are used to send and receive signals between the controller and various sensors, limit switches, or other binary devices. The PoKeys57CNC has numerous I/O pins that allow for advanced configurations, including the ability to trigger actions based on input signals.
- Analog Inputs/Outputs: If your CNC machine includes components that require variable voltage control—like certain types of sensors or speed controls—the analog pins will be necessary. These connections allow for more nuanced data reading, giving you finer control over your machine.
- Step/Direction Signals: These are used to control stepper or servo motors, guiding the movement of your CNC machine’s axes. Accurate motor control is essential for precision machining, making this section of the pinout critical.
- Power Supply Connections: Properly supplying power to your PoKeys57CNC and attached components is crucial. The pinout will specify where to connect your power supply to ensure the board and all connected devices operate correctly.
By familiarizing yourself with the pinout, you ensure that each component is connected accurately, avoiding common mistakes that can lead to communication errors or hardware damage.
Wiring Your CNC Machine Using the PoKeys57CNC Pinout
When wiring your CNC machine, following the PoKeys57CNC pinout precisely is essential to avoid setup problems and ensure accurate machine control. Here are some tips to help you get started:
Label Your Cables: When you’re wiring up multiple devices, it’s easy to lose track of which cable goes where. Use labels to identify each connection, making the installation process simpler and preventing errors.
Double-Check Your Connections: Before powering on your CNC machine, take the time to double-check each connection against the PoKeys57CNC pinout diagram. A single misplaced wire can cause malfunctioning or even damage sensitive components.
Test in Stages: If you’re integrating multiple elements (motors, sensors, limit switches), test each component individually before combining them. This way, you can quickly identify any issues if something doesn’t perform as expected.
Use High-Quality Cables and Connectors: Signal integrity is critical in CNC machines, especially when dealing with high-speed operations. Invest in good-quality cables and connectors to ensure consistent and reliable performance.
Benefits of Using the PoKeys57CNC
The PoKeys57CNC pinout enables a flexible and scalable setup, making it a favorite among CNC builders who want to customize their machines. Some benefits of using PoKeys57CNC include:
- Broad Compatibility: It supports both Mach3 and Mach4 software, which means you can use it with legacy systems or more modern CNC setups, providing a clear upgrade path if you decide to switch from Mach3 to Mach4.
- Customizability: The PoKeys57CNC’s extensive I/O options allow for highly customized CNC machines. Whether you’re integrating custom sensors, additional axes, or unique tools, the PoKeys57CNC provides the necessary connections.
- Ease of Use: The well-documented pinout and supportive community make troubleshooting and installation straightforward, even for those relatively new to CNC systems.
- Reliability: PoKeys57CNC is known for its robust construction and reliable performance, making it a trusted choice for both industrial-grade machines and home-based CNC projects.
Understanding the PoKeys57CNC pinout is the foundation of setting up a well-integrated CNC system. As we move into the next chapter, we’ll discuss how to enhance safety with the use of Mach3 limit switches, ensuring your machine operates smoothly and safely at all times.
Mach3 Limit Switches: Ensuring Safety and Precision in CNC Operations
When it comes to operating CNC machines, safety and precision are paramount. One crucial component that plays a vital role in ensuring both of these factors is the Mach3 limit switch. These switches are essential for protecting your machinery from potential damage caused by overtravel and ensuring that your CNC machine operates within its designed parameters. In this chapter, we will explore what Mach3 limit switches are, how they function, and why they are indispensable in any CNC setup.
What Are Mach3 Limit Switches?
Mach3 limit switches are safety devices that detect the position of the CNC machine’s moving parts, such as axes or tools. Typically installed at the extremes of the machine’s travel paths, these switches act as stop signals to the control system, preventing the machine from moving beyond its operational limits. This functionality is crucial because exceeding these limits can lead to mechanical failures or damage to both the CNC machine and the workpiece.
Limit switches can be mechanical or electronic. Mechanical limit switches are activated by physical contact with the machine’s moving parts, while electronic switches use sensors to detect proximity. Regardless of the type, their primary function is to communicate with the Mach3 CNC controller, which then takes appropriate action to halt or redirect the machine’s motion.
The Role of Limit Switches in CNC Operations
In the context of the Mach3 CNC Controller, limit switches serve several important functions:
Preventing Overtravel: The primary purpose of limit switches is to prevent the machine from moving beyond its designated range of motion. This overtravel protection helps avoid costly repairs and downtime by ensuring the machine does not hit hard stops or exceed its mechanical limits.
Enhancing Safety: Limit switches contribute to the overall safety of the CNC operation. By ensuring the machine stops automatically when it reaches its limits, these switches help protect operators and nearby personnel from potential accidents caused by runaway machines.
Position Feedback: Limit switches can provide valuable feedback to the Mach3 CNC Controller, helping it understand the machine’s current position. This feedback is crucial for accurate positioning and coordination of multi-axis movements.
Establishing Home Positions: Many CNC machines use limit switches to establish a home position, which is the starting point for all operations. This positioning allows the controller to calibrate the machine accurately before beginning any tasks, ensuring consistent results.
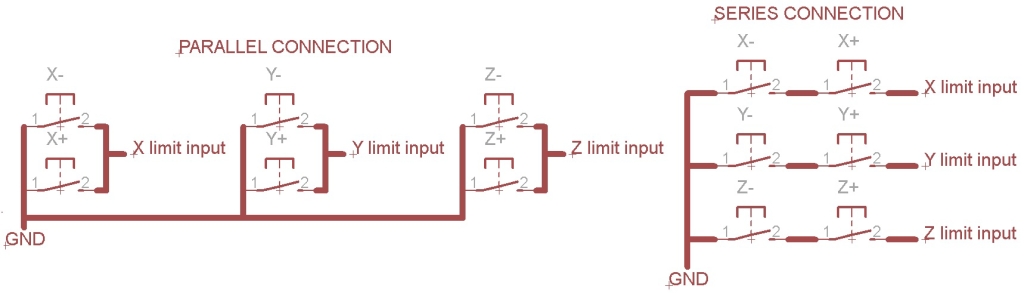
Installing Mach3 Limit Switches
Installing limit switches in a CNC setup is a straightforward process but requires careful attention to detail. To ensure proper functionality, the switches must be positioned accurately at the extremes of each moving axis. It’s crucial to consult the specific installation instructions for your machine and Mach3 settings to determine the optimal locations for the switches.
Once installed, you’ll need to configure the Mach3 software to recognize the limit switches. This involves setting up the appropriate parameters within the software, allowing it to respond correctly when a limit switch is activated. Configuring Mach3 to handle limit switch signals ensures that the controller reacts appropriately, stopping the machine or taking corrective action when necessary.
Benefits of Using Mach3 Limit Switches
Incorporating Mach3 limit switches into your CNC operation comes with numerous advantages. Firstly, they significantly reduce the risk of mechanical failure, which can be a costly consequence of overtravel. Additionally, they enhance the overall safety of the machine, protecting both operators and equipment.
Moreover, the ability to establish home positions through limit switches improves the precision of CNC operations. By providing accurate positioning data, these switches enable your CNC machine to execute complex tasks with confidence and reliability.
Limit switches are not just an optional feature; they are a critical component of any serious CNC setup. They create a safer working environment, contribute to the longevity of your machine, and ensure that you achieve the high-quality results expected from CNC machining.
As we transition into the next chapter, we will provide a practical Mach3 tutorial CNC that will guide you through setting up and optimizing your CNC machine using Mach3 software, including how to integrate the functionality of limit switches for enhanced performance and safety.
Mach3 Tutorial CNC: Step-by-Step Guide to Optimizing Your CNC Setup
In the world of CNC machining, having the right software is only part of the equation. Mastering the use of that software is equally essential for achieving precision and efficiency in your projects. This Mach3 tutorial CNC aims to guide you through the setup and optimization of your CNC machine using Mach3 software. Whether you’re a beginner or looking to refine your skills, this step-by-step approach will help you get the most out of your CNC setup.
Understanding the Mach3 Interface
Before diving into the setup process, it’s important to familiarize yourself with the Mach3 interface. Upon launching Mach3, you’ll be greeted with a user-friendly dashboard that displays various controls and indicators. Key components include:
- Main Menu: Here, you can access different functions such as configuration settings, tool paths, and operational controls.
- Machine Control Panel: This section allows you to control the movement of your CNC machine. It includes buttons for jogging, starting/stopping operations, and emergency stop features.
- Status Indicators: Keep an eye on these indicators to monitor the state of your machine, including whether it’s in a ready state or if any limit switches have been triggered.
Familiarizing yourself with these components will make navigating through the software much easier as you proceed with the setup.
Setting Up Your CNC Machine with Mach3
Installation: Begin by installing Mach3 on your computer. Ensure that your CNC machine is properly connected to your PC via the PoKeys57CNC controller or your preferred connection method. Follow the prompts in the installation wizard to complete this process.
Configuration: Once Mach3 is installed, you’ll need to configure it for your specific CNC machine. Start by opening the “Config” menu and selecting “Ports and Pins.” Here, you can set up the input/output ports based on the PoKeys57CNC pinout, ensuring that the software correctly communicates with your machine’s hardware.
Axis Calibration: It’s essential to calibrate your machine’s axes to ensure accurate movement. Use the “Motor Tuning” settings in the Config menu to adjust the steps per unit and velocity settings for each axis. Conduct a test run to ensure that the movement is precise and that each axis responds correctly to your inputs.
Setting Limit Switches: Incorporate the functionality of Mach3 limit switches by configuring them in the “Ports and Pins” section. Assign the input signals to the correct pins as specified in the PoKeys57CNC pinout. Make sure to enable the limit switch function so that the software can halt movement when a switch is activated.
Creating Toolpaths and Running Your CNC
After successfully setting up your machine and configuring the limit switches, the next step is to create toolpaths for your projects.
Creating Toolpaths: Utilize a compatible CAD/CAM software to design your parts. Once your design is complete, export the toolpath in a format compatible with Mach3, typically as G-code.
Loading G-code in Mach3: Open Mach3 and load your G-code file through the “File” menu. This file will instruct your CNC machine on how to execute the desired operation.
Simulation: Before running your machine, use the simulation feature in Mach3 to visualize the toolpath. This step helps you identify any potential issues before the actual machining process begins.
Starting the Job: Once satisfied with the simulation, prepare your CNC machine for operation. Ensure the workpiece is securely in place, and all safety measures, including limit switches, are functioning correctly. Start the job by pressing the “Cycle Start” button on the control panel.
Monitoring and Fine-Tuning Your CNC Operation
As your CNC machine begins to operate, it’s essential to monitor its performance closely. Pay attention to the following aspects:
- Feed Rate and Speed: Adjust these parameters based on the material you’re working with to ensure optimal cutting performance. Mach3 allows you to modify these settings in real time if needed.
- Tool Wear and Maintenance: Regularly inspect your tools for wear and replace them as necessary. Keeping your tools sharp is key to achieving clean cuts and extending the life of your CNC machine.
- Adjusting Parameters: If you notice any inaccuracies or issues during operation, don’t hesitate to stop the machine and adjust the settings accordingly. Fine-tuning your CNC setup is part of the process, and even minor adjustments can lead to significant improvements in performance.
By following this Mach3 tutorial CNC, you’ll not only be able to set up your machine effectively but also optimize its operations for maximum efficiency and safety. This knowledge will empower you to tackle more complex projects with confidence, leveraging the full capabilities of your CNC machine and the Mach3 software.
Key Takeaways
In this comprehensive guide, we’ve explored the essential components of a successful CNC setup, starting with the Mach4 CNC Controller, understanding the PoKeys57CNC pinout, the significance of Mach3 limit switches, and a practical Mach3 tutorial CNC for optimizing your operations. Each element is interconnected, contributing to a cohesive and efficient CNC system.
The Mach4 CNC Controller serves as the backbone of your operation, while the PoKeys57CNC ensures smooth communication between software and hardware. Mach3 limit switches provide crucial safety measures, and the tutorial equips you with the skills to harness the power of your CNC machine effectively. Armed with this knowledge, you’re well on your way to mastering CNC machining and producing high-quality results in your projects.
Conclusion
Navigating the world of CNC machining can be a complex journey, but with the right tools and knowledge, you can achieve remarkable results. This guide has delved into the integral components that make up a successful CNC setup, highlighting the essential role of the Mach4 CNC Controller, the importance of understanding the PoKeys57CNC pinout, and the necessity of implementing Mach3 limit switches. Additionally, we provided a comprehensive Mach3 tutorial CNC to help you effectively set up and optimize your machine.
The Mach4 CNC Controller stands out as a powerful software solution that enhances your machine’s capabilities, offering advanced motion control and a user-friendly interface. Meanwhile, the PoKeys57CNC serves as the critical bridge between your hardware and software, ensuring seamless communication through its clear pinout. The inclusion of Mach3 limit switches not only enhances safety but also protects your equipment from potential damage caused by overtravel. These switches are indispensable for creating a reliable and efficient CNC operation.
Moreover, our tutorial has equipped you with the foundational skills needed to configure your CNC machine, load toolpaths, and monitor your operations effectively. By following these steps, you can ensure that your CNC machine runs smoothly, achieving high precision and quality in your projects.
As you continue your journey in CNC machining, remember that mastering these components will empower you to tackle increasingly complex tasks and elevate your craftsmanship. With the insights gained from this guide, you are now well-prepared to make informed decisions that will enhance both your CNC experience and the quality of your work. Embrace the challenges ahead, and watch as your skills and creativity flourish in the exciting world of CNC technology.